Saturday 30 November 2013

Churn Dash Border {Midnight at the Oasis}

So sorry about the delayed post again, I've been distracted by other projects over the last few weeks and haven't worked on my MATO quilt for ages.

I did make one tonight, so I could share how I'm approaching these (insanely) teeny tiny blocks. I'm pressing all my seams open in these - I find my piecing is far more accurate if I press open, and since these are so small I think every little bit of accuracy will count over the whole border.


For the HSTs, I'm starting with 2" squares, marking the diagonal and sewing 1/4" away from both sides. Once pressed (open) I'm trimming down to 1.5".


For the little rectangles on the sides, top and bottom, I'm strip piecing and then cutting my rectangles to size.


I'm hoping to make lots of these over the next couple of weeks and try to catch up a bit - I haven't really done much more applique than I had in my last QAL post, I really think that will become a summer project :o)

I hope you're all having fun making this quilt. I am absolutely loving seeing how different each version is!

xx Jess

Wednesday 27 November 2013

Down Under Doll Quilt Swap

I have been uncharacteristically quiet on the blog lately - mostly because I've been working on a 80" square quilt for a magazine, so haven't been able to share my progress (although I have been sharing a fair few peeks over on Instagram). It's completely finished as of last night though, so I'll be back here waffling about my quilty projects again until the next one ;o)

A couple of months ago, I signed up for the Down Under Doll Quilt Swap - a mini quilt swap for those of us based in Australia and New Zealand. I have been working on this in little spurts over the last month or so, but the last day to send is the first of December, so I pulled my finger out and finished it up today.

This is an idea I've wanted to try for a while, so it was a lot of fun to put together. I was a bit concerned about how well my points would match up as I didn't starch my fabric before cutting all the triangles, but I'm pleasantly surprised. A couple are a wee bit off, but mostly it came out really well.


After working for so long on a large quilt, it has been a really nice change to work on something small (my arms are especially grateful!) This little quilt is about 18" square.


I kept the quilting fairly simple, since there are so many seams in the quilt top (each of those strips in the triangles are 1" finished). Even so, I really like the texture the minimal FMQ has added. It has helped highlight the subtle pattern created by the light grey partial hexagons - although I did mess up some of the piecing at the bottom. Hopefully it's not too noticable!


I'll be posting this one tomorrow, so hopefully my partner likes it. I have actually started another version of this on a larger scale and will be taking photos and write up a tutorial for how I put it together, so stay tuned for that in the next few weeks :o)

xx Jess

Wednesday 20 November 2013

Adventures in hand piecing

Each month since May, I've been getting a squishy parcel of fabric for the Bring Me Flowers BOM (run by Amitie Textiles), but until fairly recently they've been sitting untouched. When I joined up for the BOM (which is designed with hand piecing in mind) I decided I'd really like to hand piece this quilt. Only problem was I was really dubious about my ability to actually piece anything by hand.

Long story short, I decided to just give it a go and hope for the best. I never really understood the attraction, or how people like Alison could be bothered spending so much time hand piecing something when machine piecing is so much faster. But at the same time, it was something I really wanted to try (because, you know, I'm a huge fan of learning new skills when it comes to quilting). I am SO glad I tried it, because I am absolutely addicted. I love the slow pace, the portability and the satisfaction I get from making something with my hands as opposed to my machine. I still really love machine piecing too, but I can see how hand piecing will become a handy skill especially with y-seams and the like.

I've finished the first month blocks, and am working on month two.


I think the other thing I love about these blocks is Jen Kingwell's amazing fabric choices. It is really fun to be using fabrics chosen by someone else, and seeing how they work together. I'm learning a lot through this process as well :o)


xx Jess

Sunday 17 November 2013

Rainbow and low volume bundle


About a month ago, I put together an order for a bundle of fabric from one of my sponsors, Sew Me A Song. I was deliberately restocking some of my favorite low volume fabrics before my diet begins next year, and added in some more colourful prints, a lot of which I have used up in recent projects. Becca's shop really is my one-stop-shop when it comes to low volume - she stocks the most amazing range of texty and quirky low volume prints I've come across.

So this bundle of gorgeous landed on my doorstep on Friday (via Canada - quite the adventurous parcel!). And (squeee!!) Becca has cut a couple of extra bundles and listed them in her shop.  


So if you need a whole lot of texty goodness (plus a stack of other really useful prints) head over and take a look ;o)

xx Jess

Saturday 16 November 2013

Flower Applique Border (Midnight at the Oasis QAL)

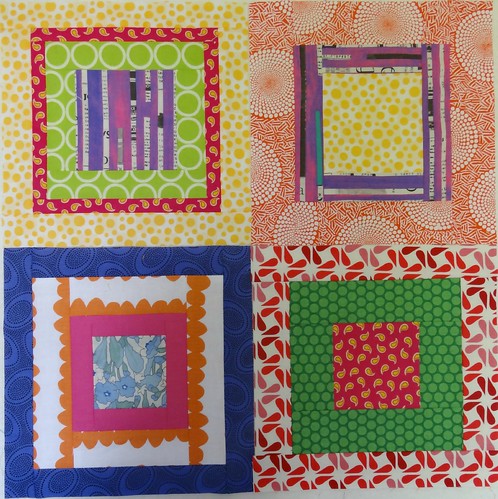
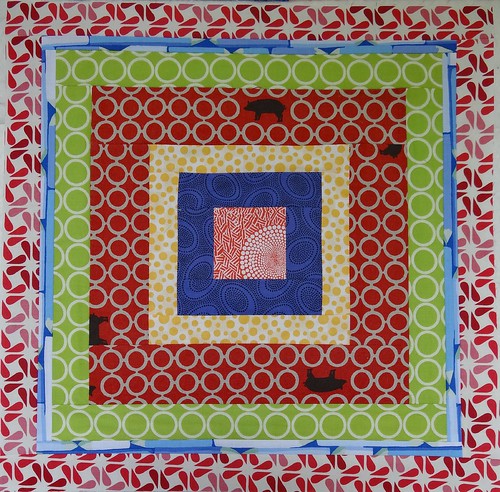
 Apologies that this post is a bit late - I've been really sick the last few days. This week I'll be talking about the second border - the flower applique border. I am way behind in this QAL at the moment - needle turn applique is a really slow process, but I am completely addicted. I'm enjoying the applique part of this quilt way more than I thought I would. This is my progress so far.


There are a few elements involved in the second border (technically the fourth I guess, but I haven't been counting the skinny borders). 

1. Bias Tape
The pattern recommends using a 3/8" bias tape maker, but since I don't have one I thought I'd share how I'm making my bias tape. First of all, make a 45 degree cut across your fabric. I've found a 5" wide strip makes the right length strips (or slightly long strips) to applique on to the background. I've used a couple of charm squares for some of my strips, and will use the left over triangles to make some of the leaf shapes to applique. 


Then cut 3/4" strips of fabric.

The next step involves folding both sides into the centre of the strip to make single fold bias tape. To make this easier, you can run a Hera marker along the wrong side of the fabric to make a crease. I have found by placing my ruler at about 3/8" from the edge, the creases are in the right position.


Once you have creased the fabric, press both sides into the centre of the strip. If you don't have a Hera marker, you can fold the strip in half and press, and then fold each edge in to meet the centre crease. Either way, you will end up with strips like this:


Next you'll want to pin your bias tape onto the background for your flower applique border. I have slightly overlapped the ends of the bias strips, but you could just butt them up against each other.

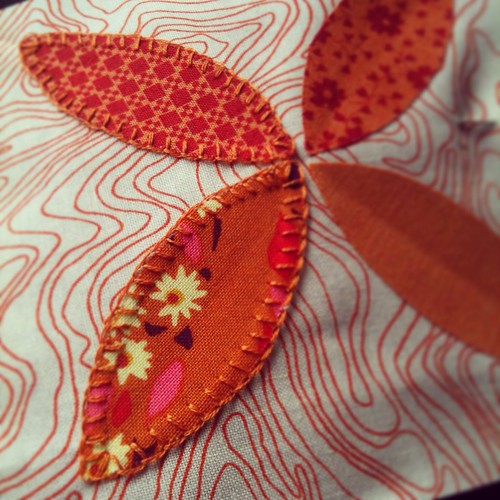
To sew these down, I worked along one entire edge, using the same stitch technique as in needle turn applique, and then worked my way back up the other edge. The it's just a matter of choosing fabrics to make the flowers, covering the joins in the bias strips in the process of stitching them on.


I haven't made my baskets yet - but looking at the pattern instructions I don't have much to add. The only change I'm making there is to make my half-square triangles using my normal method (with two squares right sides together, marking the diagonal and stitching 1/4" away from the diagonal on both sides). The HSTs in the baskets will be 1" finished.

We would love it if you would like to link up your progress so far!

Friday 8 November 2013

Giant Chevron Pattern Release

I'm so excited to be able to tell you my Giant Chevron pattern is now available to purchase in my Craftsy shop and my Etsy shop! This quilt was published back in July in Quilters Companion as a lap sized quilt, but thanks to my wonderful group of testers I ended up writing in two size variations in addition to the original size. Each of these wonderful ladies is offering two copies of the pattern as a giveaway, so be sure to click through to their blogs for your chance to win a copy :o)

This pattern is incredibly beginner friendly, as it's made using half-square triangles and squares. It's also pre-cut friendly - the baby size can be made using charm squares, and the lap and twin sizes can be made using a layer cake. I'd love to show you the versions my testers made, as it shows just how easy it is to make this pattern your own.

Kirsten (of Gemini Stitches) has actually made two versions of this quilt already - and has plans to make another for her son using Parson Gray fabric. This is the baby version, made using a charm pack of Farm Fresh. This is such an adorable baby quilt.


And Kirsten's second version. Aqua and orange goodness!

Lucy made an absolutely gorgeous rainbow version with low volume background (be still my beating heart!!) for a friend of hers.


Nat truly made this her own, and pieced some of the chevron stripes, using a very vintage palette. Pop over to her blog to check out lots more photos.


Jen made hers using solids, and has done a phenomenal quilting job. This one makes me want to make a second version and go to town on the quilting!!


And finally, Di made this beautiful version. I adore her colour choices.


Each of my awesome testers will be writing up a blog post with lots more photos I'm sure, so it would definitely be worth clicking through and checking them out :o) Thanks again to all of you, it is such an amazing thing to see my design brought to life by each of you - I couldn't have asked for a better bunch of testers xx 

xx Jess

Thursday 7 November 2013

The great bee catch up

Over the last month I've been making a lot of bee blocks - I was so behind I had to make blocks from May for one of my bees (feel free to slap my hand here.) As of today though, I am completely caught up!

This is my September block for Stash Bee (using the Weathervane tutorial at Don't Call Me Betsy).


And September for Jules in Ausmod. Jules asked for two 16" blocks, made up of 16", 8" and 4" square in square blocks.


Jules' blocks #1


Jules' block #2

October's Stash Bee block is this pink and brown pinwheel.


And Jenn (aka Penny Poppleton) sent us some Constellations to make these beauties. I drafted paper foundations and paper pieced these (too many scary bias edges).


So I just have my November blocks to go. Stash Bee finishes up at the end of November, and we have a break until January in Ausmod so I will actually have December free!

If you are interested in joining Stash Bee next year, Danny is running signups at the moment. She has written some awesome posts covering everything you might want to know - head over to the Stash Bee blog to find out more :o)


xx Jess

Wednesday 6 November 2013

Fabriholics Anonymous

Hi, my name is Jess, and I'm a fabriholic. The time has come for an intervention. For real.

Just to put things in perspective, I have been quilting for a bit over two years. This is my stash as of a few months ago (it currently looks nothing like this, just so you know. It's back to its normal level of chaos.) I think you might understand now why I feel the need for a complete fabric diet. 


Some of you may remember my pledge at the beginning of this year not to buy fabric during 2013. Admittedly I did last four months before falling off the wagon, and I have been far more restrained than last year, but still. I think it would take me half a life time to sew my way through these shelves of fabric.

So. The intervention. After a prolonged Instagram conversation a few weeks ago, Rebecca and I decided to make a pact not to buy fabric in 2014. I'm embarrassed to admit this is already making me break out in a cold sweat (and I'm not really joking.) This is an official ban, and we have rules.

GOALS:
- To use the Stash I already have!
- Finish UFOs without distraction by shifting to other new beautiful fabric.
- Stop the insanity of constantly buying the latest and greatest fabric.
- Save the $$ I spend on stashing. For me, this is going to mean I start saving for a long arm. That dream simply isn't going to happen while I spend every little bit of my quilty earnings on fabric. And it's a dream I desperately want to happen.
- Destash the fabrics that I realize I am never going to use.

FABRIC FAST RULES:
1) No fabric purchases for 6 months beginning January 1, 2014.   
2) At 6 months reevaluate status and decide whether to keep going for full year.  Evaluation July 1, 2014.
3) Create a UFO list and complete them!
4) Exceptions
  • Backing: purchasing a backing to finish a quilt top is permissible.  However, attempting to use fabric in your possession for a backing is preferable.
  • Books and Magazine purchases are allowed as they are not fabric.  Notions acceptable too.
  • Swap Mama Fabric: if hosting a swap you are permitted to by fabric to execute swap duties, but you may not join a swap simply for the sake of being able to buy fabric!
  • Quilts for Publication: if you are making a quilt for a publication and need certain fabric to execute it correctly then that is a major exception - who can blame you?

If you are like us and would like to commit to not buying fabric next year, we would love the moral support. Solidarity in numbers and all that. We have a button you can grab:


Favorite Fabric Swap


And if you're keen to join us, Rebecca has started a linky to keep us all honest.

Over the next week or so, I'm going to make a list of all my UFOs so I know what I'm working with next year - and I will be destashing as well at some stage soon. So, are you up for the challenge?

xx Jess

Tuesday 5 November 2013

Moving In

Over the last few months, we've been planning to move my sewing space down to our garage. Until now, I've been sewing in the study and slowly taking over more and more space in there, so it was a joint decision to clean up the garage (which was really full of junk) and move my sewing stuff down there.  

Over the weekend, I decided to have a look on a secondhand website for a sewing cabinet on the off chance that there might be one. And by total and complete luck there was - an Australian made Horn sewing cabinet no less. I'm really not sure how I fluked it - these cabinets have such a brilliant reputation pretty much no one ever sells them second hand and it was just on a whim I even checked. Fate I tell you. I came home with us on Sunday :o)

So over the last few days, my amazing man has been cleaning out the crap to make room for me to set up down there. 


There are a couple of features I especially love about this set up - I can sink my machine down so it's flush with the table top, which is going to make quilting SO much easier. Not having to drag the quilt up onto the bed of my machine will make it a lot less jerky doing large quilting motifs. Plus I can use my knee lift bar for the first time. I still haven't actually sewn on my new desk (I have just finished moving everything in) but I'm hoping to get a chance to soon.

Right next to my sewing desk is a wall with a big sheet of plyboard stuck to it - this will become my design wall. I'm planning on stretching some batting over it and nailing it on (I think that should work?) My current design wall is movable - so I'll use it next to this one if I need extra space.


I'm very happy that I can FINALLY hang my awesome hoop Katy made me last year in the Sailors Mouth Swap right near my machine. I want to hand my other swap mini quilts to cover the bricks too - need to figure that one out...

My old sewing desk has moved down as well, and set up as my cutting station. This table used to house my machine and my cutting mat, so I feel like I have SO much space. I'm able to access it from both sides too, which will be really handy.


Just to keep it real, this is what the other side of the garage looks like. I'll be sharing it with the bikes and camping gear - but don't get me wrong, I'm not complaining. I fully realise how lucky I am to have a space like this set up for sewing!


 xx Jess


Sunday 3 November 2013

Challenging myself

Over the last month or so, I've been putting together my next project for Quilters Companion and have finally reached the quilting stage. The design of this quilt is quite simple, so I'm trying something new (to me) and creating a secondary pattern with the quilting (heavily inspired by the likes of Angela Walters). I'm the first person to admit that I love a challenge when it comes to quilting, and what I'm attempting on this quilt is really challenging my skills as a quilter :o)

I've been using my recently acquired Hera marker to mark some foundation lines onto the quilt top, free motion quilting along these first and the filling in with some of my favorite motifs. 


My straight lines aren't completely straight - but I'm trying to remind myself I'm doing this on a domestic machine, not a long arm so I can't expect it to be flawless (as much as the perfectionist in me struggles with this concept!) And honestly, on an 80" square quilt I'm pretty sure no one but me will notice the imperfections anyway.


I'm doing a bit of matchstick quilting for the first time, and I can really understand the appeal now - I don't think I could handle doing it on an entire quilt, but for the little sections I'm doing it is adding some really great texture.

I'm really pleased with this arrow quilting - I marked the centre of the strips with my Hera so that the point are all lined up. Definitely something I'll be using more - it's quick to do and looks really cool!


I won't be showing any more of this one until it's published sometime next year - but you'll understand if things a wee bit quiet around here for a few weeks ;o)

I also wanted to mention that my Full Moon Lagoon has been nominated for viewer's choice in the Blogger's Quilt Festival - I am completely in awe that it has been nominated (huge thanks to whoever nominated me!) Quite a few of my friends have quilts that have been nominated so it is going to be very hard to choose. I encourage you to go and have a look and vote for your favorite (and also vote in each of the categories, there are some truly remarkable quilts entered in all of them.)

xx Jess

Friday 1 November 2013

Orange Peel Applique Blocks {Midnight at the Oasis QAL}

Welcome to the second installment of the Midnight at the Oasis QAL. I hope you've all had fun making your centre block - I'm really enjoying seeing all the different versions popping up on Instagram and Flickr. There is a linky at the bottom of this post if you'd like to link up your centre block or any other progress you've made. You can find Sharon's post on how she approached this border here.

So, this week I'll be talking about different ways to tackle the second border, the orange peel blocks. These blocks are applique blocks - and there are a whole lot of different ways you could approach them. I haven't had much experience at all with applique methods, so I've provided links to some tutorials written by other people that I think look good. It's worth keeping in mind that each of these methods will look slightly different when done, and require different amounts of time; both factors will probably play a role in which method you decide to do. You can find Sharon's post on how she approached this border here.

Needle Turn Applique:

A couple of days ago, I wrote a tutorial explaining how I'm doing my needle turn applique using Sarah Fielke's method. Straight up I will say needle turn is enjoyable - but slow. I've only done three of my blocks so far, but I really love the way the applique shapes pop up from the background so I will persist even if it takes me the next six months to get them done ;o)


Machine Applique
Appliqueing all the orange peels by machine will be much, much quicker than any of the hand-sewn methods. You can find a tutorial here for machine applique. I haven't done a lot of machine applique - but for the bits I've done I used vliesofix fusible web and machine blanket stitched around the edge of my applique shapes. This method makes the shapes a little stiff, but it's a pretty quick method which is a bonus!


DSCN62430001

Freezer Paper Applique
There is a great video tutorial on this method here. This definitely a method I'd like to try - Heidi has used the freezer paper method for her applique and it looks fantastic.


Blanket Stitch Applique
My friend Adrianne (of On the Windy Side fame) is using blanket stitch to applique her orange peels - she has very kindly written up a tutorial on her blog which you can find here. I love the way these look - and Adrianne's stitches are just perfect!


If you would like to link up your progress so far, you can do so below. It's always fun to click through and visit other people's blogs and leave a comment - my favorite thing about QALs is encouraging and supporting each other and seeing how different people interpret the same pattern :o) You can link up from your blog or Flickr - if you have any problems please let me know (I don't host linky parties very often!!)